5 Easy Steps for Busy Cooks to Make Healthy and Tasty Fries at Home

There aren’t too many people who do not like French Fries!  Actually, I can’t think of anyone I know who does not like them.  Of course, many adults have learned to see these as treats and only eat them occasionally.  I do enjoy fries, but know that I can’t eat them all the time. So, when I get a craving, I make a healthier baked version at home.  Because they are seasoned and I get them crispy, they definitely satisfy my craving.

IMG-6983If you want home-baked, crispy, flavourful fries, here’s what to do:

  1. Wash and dry red-skinned or Yukon Gold potatoes.  Leave the skin on. I usually do one medium potato per person for average appetites
  2. Slice potato longways into about ½ inch thick pieces.  Then slice the rounds into about ½ inch thick sticks
  3. Put all the sticks in a bowl with some olive oil, salt, pepper, paprika and garlic flakes or garlic powder.  Toss to evenly distribute the oil and seasonings. Drain excess oil through a slotted spoon
  4. Place potato sticks on a baking sheet with space between them to allow the air to circulate.  (You can line the baking sheet with foil or parchment paper if you like)
  5. Bake on the bottom rack of the oven at 350 to 375 degrees for about 25 to 30 minutes or until crispy.  Turn them over halfway through the cooking time. If you have a convection oven, switch to the convection setting for the last 5 minutes for extra crispiness

I have tried using convection for the whole time and lessening the cooking time, but I have found that the fries come out crispy, but a little too dry inside.  Only using convection for the last few minutes seems to preserve the soft potato pulp inside the fry.


IMG-6984
Thanks to Strewn Winery for this tasty idea for oven-roasted green beans

I posted a photo of the fries and the rest of the dinner that went with it on Instagram last week.  Perhaps some of you saw that post. I also roasted some green beans in the oven with olive oil, salt, and pepper.  They come out great that way and seem to have a more intense flavour than boiling or steaming gives them. This is a quick and easy way to do them and I thank Strewn Winery for that idea!!  We got the recipe from a cooking class we attended there years ago and use it regularly!  The marinated, grilled chicken breast was the main part of the meal and we had a mixed green salad too. 

Our go-to marinade for the chicken is:

  • 1 tbsp olive oil
  • about 1/8 cup lemon juice
  • 1/2 cup dry white wine
  • 1 crushed garlic clove
  • salt and pepper

This is a go-to for us because they are tasty ingredients that we always have in the house.  You can certainly change it up by using orange juice or lime juice instead of lemon and add some herbs too.  Check out what you have in your pantry and make your marinade according to the flavours you enjoy…leave out the citrus and wine and use soy sauce and ginger…the options are endless!IMG-6985

This meal comes together in no time and is tasty any time of year for your family, or even for company.   You can also do the fries with sweet potatoes and other root vegetables like carrots, rutabegas, parsnips and turnips. 

Because you can control the amount of fat, salt and seasonings when you cook at home, go ahead and enjoy these tasty fries any night of the week.  Give it a try and let me know what you think! Happy Cooking, friends!

An alert for my email followers!

Hi all,

If you subscribe to this blog via email, you will notice that the recipe link in the email you just received takes you to the wrong place.  Here is the corrected link:

Pot Pie with Puff Pastry

For those who are directly accessing the blog and wish to read the current post, the link is correct.  Please keep reading below, or click on the October archives to read the current post on limiting food waste and making a delicious Turkey or Chicken Pot Pie.

My apologies for the inconvenience!

3 Ways to Keep the Easy Summertime Cooking Going into September

I have been meaning to share my many make-ahead salad recipes with you all summer, but it seems that I have just been spending time enjoying summer fun, cooking, entertaining and soaking up time with my family and friends during this fabulous summer.  Even though it’s Labour Day already I know summer isn’t over yet! We’ll still have some warm days, nights and weekends to enjoy throughout this month where you can still revel in some easy summertime cooking on your own or with family and friends. If you are a regular reader of this blog, you know that I am a big fan of meals that I can prepare ahead of time.  Make ahead meals seem to come to mind more quickly in cooler months when we tend to do casseroles, slow cooker recipes, and soups. But, you can also prepare things ahead to keep summer cooking easy and be less tied to the stove. And, if you do this into September, you’ll keep that summer vibe going for a little longer!

Here are 3 ways to keep that easy summertime cooking going:

  1.  Make a meal plan for the week and shop for the produce and meats you need all at once, at least a day ahead of your meal prep day
  2. Make one grain salad and one vegetable salad that will last 3 to 5 days (see below)
  3. Marinate your meat, fish or chicken before freezing it and you’ll be all set to go on the day you need it (see July 15, 2018 post for more summer cooking tips)

My secret weapon for easy summer cooking is to make salads ahead that can last for 3 or 4 meals.  We tend to think of things such as pasta salads, potato salads and coleslaw for potlucks and picnics, but why not incorporate them into your weekly summer meal planning?  I have been doing this for many years now and it helps us eat nutritious and delicious food all week long. And it takes the guesswork out of what to make each night. I usually do a pasta, potato, rice or other grain salad each week and also do a marinated vegetable, such as coleslaw, marinated green beans, tomatoes and cucumbers, etc.  With two of those choices prepared to last for 3 to 5 days, all you have to do is pull those out of the refrigerator and throw one of your pre-marinated meats on the grill – and voila…you’ll have a nutritious, fun summer meal in no time at all. These dishes last for days and in many cases, the flavour improves as the marinade sinks deeper into the grains and vegetables.  

The salad I’m sharing with you today is particularly good in the late summer as our local tomatoes are at their best.  This is yet another fresh tasting favourite from my childhood that my Mom made frequently in summer. It’s a hit whenever I make it.  You can serve it right after making it, but if you let it sit for at least 30 minutes, the flavours will combine better.

For more summer make-ahead recipes, have a look at my posts from last summer.

Enjoy!

Tomato and Cucumber Salad

  • Servings: 10 to 12
  • Difficulty: easy
  • Print

tomato cucumber

A fresh and juicy side dish for your summer meals!  It can be made ahead and kept in the fridge for 4 or 5 days.  Flavour will intensify each day. Use Roma tomatoes if you can.  They have a great meaty flesh that’s perfect for this salad.

Ingredients

  • 12 medium sized ripe Roma tomatoes
  • 1 and a half English cucumbers
  • ½ of a sweet onion (Vidalia) sliced thinly
  • 10 to 12 fresh basil leaves

Dressing:

  • ½ cup extra virgin olive oil
  • ¼ cup red wine vinegar
  • Salt and pepper to taste

Directions


  1. Slice and cut the tomatoes into bite sized pieces (4 pieces per slice usually works well)
  2. Peel and slice cucumber into bite sized pieces 
  3. Roll and slice basil leaves thinly (‘chiffonade’)
  4. Combine tomatoes, cucumbers, onion and basil in a serving bowl and set aside while you assemble dressing
  5. Mix dressing in a measuring cup or jar.  Whisk or shake to combine. Pour over tomatoes and cucumber mix and toss well.

recipe by: everydayhomegourmet.blog/ 

Make Classic French Onion Soup at Home

If memory serves me correctly, I started cooking somewhere between 18 and 20 years old – definitely much later than the ‘Top Chef Kids’ we see today!  I was going to college and university and still living at home with my parents and younger siblings. (Going away to school was not a popular thing to do at that time where I lived since it was a major city with a number of high-quality universities close by.  In fact, from what I know, it is still very similar today).

As a tween and teen, I was interested in what my Mom was doing in the kitchen and always wanted to help.  My Mom was not keen to have us help in the kitchen. She used to say “go play”. When we asked her why she always said we’ll have plenty of years to cook when we are grown.  My Mom is a great cook and always made wonderful meals and desserts. We had lots of variety and ate nutritious, delicious, homecooked meals just about every day. At the same time, I later understood that a part of her found cooking tedious and wanted to get it done as efficiently as possible.  Teaching your young children to cook alongside you is definitely not efficient, as many of you know! Fortunately, when I did start to cook, my Mom was available and eager to answer questions on how she did things. I’m lucky to still have her as a resource today – and as years went on, she now sometimes calls me to ask me cooking questions or advice.  I take that as a real compliment!

When I started to assert myself in Mom’s kitchen and make parts of meals or whole meals, I always made things my Mom didn’t make.  It wasn’t because I was dissatisfied with her cooking, rather, I knew I couldn’t make her meals as well as she did, so I tried out recipes that were new for our family or things we had eaten occasionally in restaurants or at family and friend’s house.  Eventually, my Mom and the rest of the family grew to like the dishes I made and they became part of our rotation….(truthfully, my brother didn’t like anything I made!!! But, he was quite a picky eater as a kid. As an adult, he learned to love many more foods and he is also a very good cook!  I’ve learned a few good recipes from him too!)

One of the first dishes I made was soupe a l’ognion gratinee.  I enjoyed it in restaurants when I occasionally went out with friends and thought I’d like to try it out at home.  (And, now that I’m remembering, Mom did make this a few times in the ’70s…remember those brown onion oven safe onion soup bowls!!)  My first attempt at creating this recipe worked out well and I’ve tweaked it as the years went by to become the version that is listed below.  It’s a pretty easy recipe to make even though there are a few more steps than your average pot of homemade soup. fullsizeoutput_4deBut, it is worth the treat! The only issue for me is that it’s so filling that I always have difficulty deciding what to pair it with…when I started inviting friends for dinner in my early cooking years, I would usually pair it with my homemade Caesar salad.  Of course, all these years later, I realize that more protein is needed, so adding some grilled chicken to that Caesar would be a good option. Go to my June 19, 2018 blog to read the story of an unforgettable homemade Caesar dressing. Click here for the recipe.

Whether you decide to try this onion soup recipe as a meal on its own, or as the starter to a bigger meal, I am sure you will impress your friends and family with this one and make it again and again.  Let me know how it goes!

Happy cooking, friends!

Onion Soup au Gratin

  • Servings: 4
  • Difficulty: medium
  • Print

Ingredients

  • 1 large sweet Vidalia onion, or 4 to 6 medium cooking onions
  • 1 tbsp butter
  • 1 clove garlic minced
  • ¼ cup dry white wine
  • 1 litre best quality low salt beef stalk (or homemade beef stock)
  • Splash of cognac (optional)
  • 1 bay leaf
  • Salt and pepper to taste
  • Dried or toasted French bread slices, about 1 inch thick
  • Approximately 4 ounces of strong white cheddar or gruyere cheese, sliced
  • 2 heaping tbsp quality parmesan cheese

Directions

  1. Thinly slice onions and set aside
  2. Melt butter in pot
  3. Add onions and garlic and saute until onions are translucent and soft
  4. Add wine (and cognac if you are using it) and combine
  5. Next, add beef stock and seasonings
  6. Combine and simmer 20 to 30 minutes
  7. Preheat broiler
  8. Pour hot soup into oven/broiler safe bowls
  9. Cover top with dried or toasted French bread
  10. Cover toast with cheddar or gruyere, sprinkle parmesan on top
  11. Place bowls on baking sheet covered with foil and broil until cheese is melted and slightly browned

Tips:  Serve with a napkin around onion soup bowl handle because bowl will be very hot!

posted by: everydayhomegourmet.blog/  


March is Organizing Month – 10 Tips

Once the calendar turns to March, my thoughts turn to the coming of spring and organizing the spots that need attention in our house.  I’m certainly not an expert on this subject, but I know that an organized space brings me peace, calm and helps me be more efficient. I enjoy reading articles and watching shows on organizing to see if I can get some new tips.  What you will read in today’s blog are things I’ve learned or come up with that have helped me be more organized in all areas of my home.

Over the years, I have come to believe that an organized home is not something that you can do once and be done with it.  Our needs, activities and lifestyle change over time, so you need to spend time organizing each week, or each month so that the task is not overwhelming and everything has a place.  What helps me is to pick a little spot every couple of weeks – say one drawer that’s become overstuffed – and deal with that. Larger spaces like closets, garages, basements demand more time, but you can also do those little by little if you don’t have large amounts of time available for organizing. The key is to spend a little time as you are able, and you will reap the rewards.  Remembering that organizing is not a “one and done” kind of task helps me be kind to myself and have realistic expectations that my closets don’t need to look like magazine pages to be organized and well planned.  It’s all a work in progress!

Here are 10 tips that have worked for me:

1. Understand your space and storage preferences:  I like to have things in closed cupboards, and when I open the cupboard I want to be able to easily see what is in there.  In the kitchen cupboards, I use clear storage canisters whenever possible and I label the container or cut off the part of the box that has the cooking instructions and place it in plastic wrap and put it in the container.  The clear container helps me see the quantity we have left of pasta, rice, legumes, etc. without having to take the box out and look into it.  Nothing worse than thinking you’ve got a full box of pasta and realizing just before making dinner that there are only a few strands left!

2.  Keep a running list on your fridge so you can add items you need as you use them.  This will help you be more organized for grocery shopping and will minimize over buying or forgetting something you really need.  Don’t forget to take the list with you when you go shopping! Recently, my husband and I have been using electronic shared lists on our phones and that works too.  It’s all a matter of preference!

3.  Buy just what you need and can use in a few months.  Sales on staples and non-perishable food items may be attractive, but take a look at what you can reasonably store and use in a few months.  There will be more sales coming!  (And, this is another thing that I learned through experience!!)

4.  Label everything!  I purchased a label maker more than 10 years ago and I use it in all areas of my house.  If you don’t have the budget for a label maker, you can simply use tape and a permanent marker.  It doesn’t have to be ‘magazine worthy’ to be organized! In the kitchen, I label refillable spice bottles, canisters, and even shelves to help everyone put the right glasses in the right spot.  We entertain a lot, so it’s much easier when the family and guests can open a cupboard and know where to find the glass they need.  And, then everyone has a much better shot at putting everything back in the same space that you organized for it!  No more re-sorting!  In the linen closet, I label the shelves to indicate where each type of towel goes (i.e., bath towels, face cloths, hand towels), and also the various sizes of bed sheets. That way all family members and guests can help themselves to whatever they need very easily.

5.  If it’s going in a box for later, label the box with the contents.  Everyone has stuff that they don’t use and want to keep…those things usually end up in boxes in basements or closets or under beds to be dealt with later.  If you label the box with the contents, even those hidden boxes will be organized to some degree, and you’ll spend less time searching for things.

6.  Organize your gift wrapping paper, gift bags, etc. in one spot.  Those wrapping rooms you see in magazines are really cool, but most of us don’t have space for that in our homes.  Instead, try to find a shelf or two where you can put wrapping supplies in bins and label them so the items are easy to find.  Recently, the dollar stores in my area have been carrying many sizes of clear bins with lids that are super affordable and visually appealing. fullsizeoutput_639

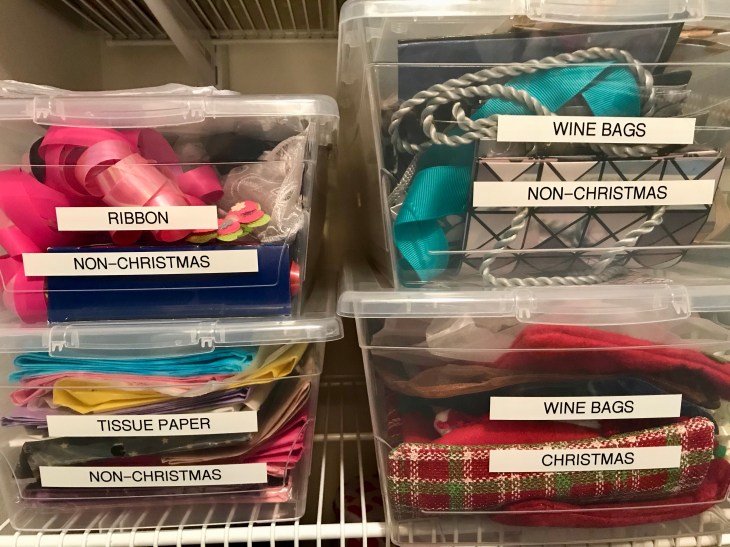
Here’s a cool idea I saw in a magazine years ago for organizing spools of ribbon. It’s a paper towel holder!  It’s very easy to use without having to take off each spool.fullsizeoutput_631

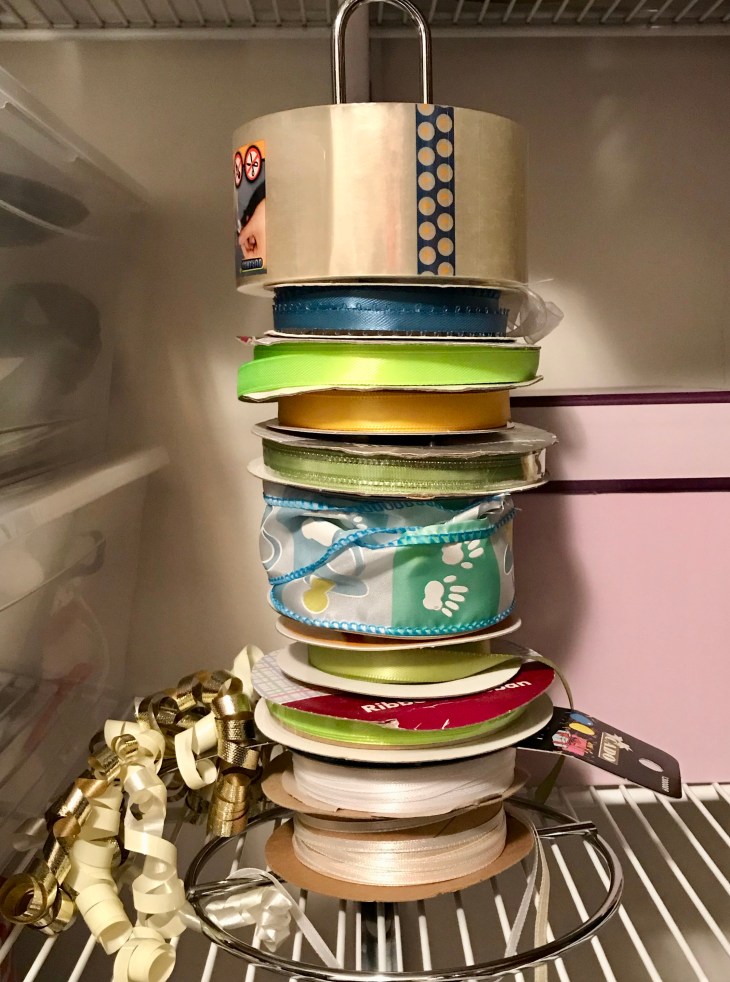
7.  Have a spot for everything.  Clutter happens when you don’t know where to put things.  Once you’ve got a space for everything, be sure to put it back in the spot, or you’ll end up with clutter again!  You might want to have a medium sized bin to put things in that don’t yet have a spot and get to it when you have more time.  Don’t make the bin too large or let it get too full, or you may have created another overwhelming spot to take care of later! I say this from experience!

8.  Every couple of months, pick a shelf or two in your kitchen pantry and bathroom cupboards and go through it to get rid of unused or expired items.  If you set the goal of doing a small area once a month or every few months, it won’t become a huge chore.  If you are really pressed for time, try to be sure to do it once a season or once a year! Again, do what you can manage…perfection is not the goal!  Celebrate small wins!

9.  Go through your clothes every season and be realistic about what you are not wearing anymore.  A group of women I met through work last year said that once a year they have a clothing swap get together.  They gather at someone’s house and bring all their gently used clothing and exchange it with each other. I thought that was a wonderful idea for all involved.  Definitely a money saver! Of course, you can also donate to good causes. Many organizations have drop off bins and some will also come to your house.  This year, I am trying a new tip I picked up on a local home show…they recommended turning all your hangers backwards and then put them forward after you’ve worn the piece.  By the end of the season, you should be able to see what was not worn and make a decision to keep or toss!  Hopefully, that will help me!

10.  Organize appliance and electronics manuals in one spot.  As soon as I get a manual from an appliance or piece of electronics, I date it and put it in a plastic sleeve that goes in a binder.  I used to put them in file folders, but I’ve found that the binders are more effective. I label the binders by the room in the house where the equipment lives (i.e. kitchen, living room, basement, outdoor stuff).  Having your manuals handy helps you troubleshoot minor problems with your appliances and gives information on replacement parts. Many manuals are also available online these days, and that’s a great resource too. I have used the online ones as well.  I find the efficiency of having the hard copy of the manual in front of me is a time saver and allows you to see more information at once. Of course, it’s a matter of personal preference! So, do what is easy for you!

I hope you find these tips useful and that they inspire you to tackle a small section in your home that will bring you more peace and efficiency.  Be kind to yourself and celebrate small successes! Let me know how it goes! And, please share any tips you have that work for you. I’m always looking for new ways to be more organized!  Next blog post, I’ll be back to sharing recipes! Stay tuned!

Chicken Piccata Pasta anyone?  Fast and easy…looks fancy!

As a person growing up in an Italian / Irish family, pasta was definitely part of our weekly meals once or twice a week.  Although I loved the sauces and ingredients, as a kid, I did not enjoy pasta itself very much…I know – odd for a kid, and definitely odd for a kid with an Italian-Canadian Mom!  I think it was a texture thing for me…I didn’t like soft foods much. (Rice and mashed potatoes were also in that category for me). Interestingly, my Mom still doesn’t like pasta…she said they ate it so much as kids because money was scarce and they were a very, very large family.  Pasta went a long way towards feeding 12 hungry mouths every night! My Dad became a passionate pasta lover when he joined my Mom’s family, always telling us that he never ate real Italian pasta until my Italian grandmother made it for him.

unnamed

As I got older, I did learn to enjoy pasta (and rice and mashed potatoes too!).  When I make pasta for myself and my family and friends, I like to include a number of ingredients and make it colourful.  This light tasting chicken piccata spaghettini is full of flavour and fast and easy to make. I have labeled the recipe as medium difficulty only because if you haven’t made pasta without just pouring tomato or meat sauce over it, this takes a few steps to learn.  Once you’ve done it, you will think it’s quick and easy to make. It’s a dish that will make people think you spent more time in the kitchen than you actually did. Serve it for family or for company. If you have gluten-free diners, use gluten-free pasta and dredge the chicken in seasoned cornstarch instead of flour.  Here’s the recipe…Give it a try and let me know what you think.  

Chicken Piccata Spaghettini with Sundried Tomatoes and Capers

  • Servings: 6
  • Difficulty: medium
  • Print

This is a fast, light tasting and hearty dish for all seasons!  It’s not hard to make, just takes a few steps and some confidence if you haven’t made pasta without the tomato sauce.  Make it gluten-free by dredging chicken in cornstarch instead of flour and use gluten-free pasta)

Ingredients

  • about 450 grams of spaghettini
  • 3 large boneless, skinless chicken breasts
  • ½ cup flour
  • 1 tbsp olive oil and 1 tbsp butter (for cooking chicken)
  • About ¾ cup chicken broth
  • Splash of white wine (about ⅛ cup)
  • Juice of 1 lemon
  • About a half cup of sliced sun-dried tomatoes packed in seasoned oil
  • About ¼ cup capers
  • Grated parmesan cheese
  • Chopped fresh Italian parsley

Directions

  1. Boil salted water for pasta in large pot
  2. Slice chicken breasts lengthwise and then in half or thirds if the breast is very large
  3. Place flour on a plate and season with salt and pepper.  Dredge chicken in seasoned flour
  4. Heat butter and olive oil in frying pan until hot
  5. Place chicken in pan and cook until golden brown, then turn over and do the same on the other side.  (Butter and oil together will prevent the chicken from getting too brown)
  6. Remove chicken to a plate and cover
  7. Add pasta to the boiling water and cook until ‘al dente’ (about 5 or 6 minutes)
  8. Add sundried tomatoes and capers to the pan juices and sautee for about 3 minutes while stirring
  9. Add wine, lemon juice, chicken broth and about a tablespoon of the seasoned oil from the sundried tomatoes to the pan.  Stir to combine.
  10. Return the chicken to the pan.  Cover and cook until pasta is done.
  11. Remove pasta from pot.  Reserve about ½ to 1 cup of pasta water
  12. Add pasta and pasta water to pan.  Stir to combine. Cover and cook for another minute or two to combine flavours
  13. Serve in heated bowls sprinkled with parmesan cheese and Italian parsley
  14. Enjoy!  (I didn’t want to end on 13 steps!!)

Tip:  Using pasta water and heated bowls will allow your light sauce to stick to the pasta

recipe by: everydayhomegourmet.blog/  


Labour Day Clam Bake on the BBQ…Alternative to Burgers!

Are you tired of burgers for your summer get-togethers?  Why not try a BBQ Clam Bake on your BBQ this Labour Day Weekend?  We tried this a few years ago after seeing the recipe in an LCBO magazine and it was absolutely fabulous!  I added scallops and used cooked lobster meat that I added at the end of the cooking time and it was unbelievably tasty and delicious!  We did this in a disposable foil pan on the BBQ…and it worked out great!

Since this is not my recipe, I’ll just include the link to the recipe and a photo below of my finished product.  If you have seafood lovers this Labour Day, try it out…it’s easy and looks super fancy!  It’s a one-pot BBQ dish!  Use mussels, littleneck clams, cooked lobster meat, corn on the cob, and chorizo sausage if you have it…I didn’t have all the herbs suggested, so I just used what I had and it was great!  Serve with fresh crusty bread and your favourite wine!  It’s a lovely alternative after a season of BBQ’d burgers, steaks, and ribs!

Clam bake

Happy Cooking friends!  Enjoy this fabulous dish and send a comment to let me know how you modified it to your liking!

Submitted by the everydayhomegourmet…send a note to let me know how you liked it, or modified it!


Summer Cook ahead Option Number 2!

Here’s another great option for a healthy and satisfying side dish, that will complement any summer meal. It’s my Mom’s Famous Rice Salad!  

My Mom is a wonderful cook and she has been my major inspiration for learning how to be a great home cook. From the time I was very young, I have memories of family and friends constantly complimenting my Mom on her cooking and baking. I knew that when I grew up I wanted to be a great cook just like her because it seemed to make people so happy.  And I wanted my home to be a place where family and friends could come and feel welcome and enjoy great experiences and memories of being together, just like our family home was. Growing up, our house was the center of family gatherings for both sides of our large family. It was so much fun for my siblings and me as kids, and as I reflect as an adult, I now realize it was lots of work for my parents. But I do know that they both enjoyed that their home was a welcoming, happy place to be for their kids, family, and friends.

In the 70’s, a number of my Mom’s brothers and sisters got married within a short time of each other and started their families.  My Mom and Dad hosted all the wedding showers, stags, and baby showers in our house. My Mom made all the food, with some help from one of her sisters.  No consideration was ever given to buying food or getting the event catered because money was tight in those days. As a result, most everything was always homemade.  The food was set up as a buffet table with a combination of hot and cold dishes. Rice salad was always a part of these events. As a kid, I was always happy to see that because I didn’t like potato salad or pasta (macaroni!) salad in those days, which also were standard at those gatherings.

IMG-1233
Mom’s baby shower hosting – 1973

I always wondered why we only seemed to have rice salad at these events.  Years ago when my husband and I started this cook ahead plan, we found it easy to do in the fall and winter because you could do casseroles, soups, stews, roasts…When we got to spring and summer, we wanted lighter food and less use of the oven.  We BBQ’d just about every day, so I came up with the idea that I would make a larger batch of those famous salads from our family events that would last 4 or 5 days and then we’d just throw something different on the BBQ each day. It has made a huge difference for us.  Because making a rice, potato or pasta side dish is usually the longest part of cooking a meal, having it done ahead of time means you can have a balanced meal on the table in no time. With the strategy of making one of these salads every 4 or 5 days, we have delicious, summery meals every night and without much prep and cleaning.  (Read my previous posts for more tips on summer cook ahead dishes).

Mom’s original rice salad recipe used white rice, carrots, celery, green onion, oil, vinegar, salt, pepper, and parsley.  I have adapted the recipe slightly over the years by using brown and wild rice instead of white rice and also adding chives, just because I have lots of them in my garden!  I prefer brown rice because it’s more filling, which means you eat less volume and it keeps you satisfied longer than white rice. As I’ve said before, there is no right or wrong with salads, and you definitely don’t need to follow a recipe to make a delicious salad.  Just use whatever you have on hand. One of my other relatives has made this salad using tomatoes, black olives, basil and onion and it was delicious also! So, go ahead and change up the veggies and seasoning here to suit your preferred flavours. And, as always leave me a comment to share the version you created.  Don’t forget to dress the rice when it is still very warm to hot so it will absorb the dressing. (Thanks again to Tim, our caterer friend for that tip!)

A number of my friends and family have asked for this recipe, which is always a compliment to the cook.  But, the greatest compliments I have received were when my Mom said, “This rice salad tastes better than usual.  What did you do?” – and when I heard my Mom tell her friends that I am a very good cook. There’s nothing like getting a compliment from someone you admire so much.

Thanks Mom!  You are my inspiration!

Mom’s Famous Rice Salad

  • Servings: 6 to 8
  • Difficulty: very easy
  • Print

Rice Salad 2018 (2)

Ingredients

  • 1 cup brown rice
  • ¼ cup of wild rice (optional)
  • 1 ¾ cup cold water
  • Diced carrots, approx ½ to ⅔ cup
  • Diced celery, approx ½ to ⅔ cup
  • Sliced green onions, 1 or 2
  • Chopped fresh Italian Parsley
  • Olive Oil (2 parts, about 1/4 cup)
  • White Wine Vinegar (1 part, about ⅛ cup)
  • Salt and pepper to taste

Directions

  1. Put rice and water in a pot  – cover and bring to a boil
  2. Reduce heat and simmer on low until almost all water is absorbed (about 15 minutes), then turn off heat, keep covered, and allow rest of water to absorb into rice – (this prevents rice from sticking to the pot)
  3. While rice is cooking, chop the vegetables and parsley and set aside
  4. While rice is still warm to hot, add approximately 2 parts olive oil to one part white wine vinegar and salt and pepper.
  5. Mix well.  Taste and adjust seasonings as desired
  6. Once rice is cool, add vegetables and parsley
  7. Mix well together and serve

Variations:  Change the vegetables and seasonings as desired (tomatoes, black olives, onion, feta cheese, different herbs, etc.)

Tips:  Adding oil, vinegar, salt and pepper while rice is still warm to hot will allow dressing to absorb into rice and you’ll have no need to re-adjust seasoning before serving

recipe by: everydayhomegourmet.blog/

Lemon Couscous Salad – Here it is!

My last blog post promised the recipe for this salad, which is a new addition to my make-ahead dishes this summer.  As you read in the last blog post, my summer salads have included, rice, various types of pasta and potato salads.  These are the basis of being able to make delicious, complete weekday meals with little prep and clean up.

On Father’s Day, we attended an extended family party at R & E’s house.  They had a delicious couscous salad with a lemony dressing.  I immediately fell in love with it and thought I should make my own version of this.  I normally use vinegars in my dressings, so using lemon is a nice change of flavour.  Athough I have used lemon as part of a salad dressing before, it’s not a go-to for me, so having the salad at R & E’s house, was a good reminder for me of this alternative. 

When it comes to salads, there is no right and wrong…you can add any vegetables, fruits, nuts, seeds or herbs that you enjoy and it will taste great.  There is not much need for a recipe for making salads, so I offer mine only as a guide for you to start out and create your own dish.  I usually just peek in the fridge to see what I have on hand and start there.  On the day I created this couscous salad for the first time, we had carrots, peppers, and green onions on hand, so I thought that would make a lovely taste and colour combination with the lemony couscous.  I have also been experimenting with making my own roasted chickpeas and I had some on hand, so I tossed them in.  They provided a nutty flavour, and crunchy texture.

I did use fresh lemon juice for this since it was one of the main ingredients.  If you are in a rush, give it a try with bottled lemon juice and let me know how it goes!  I also used a lemon zester to get lovely thin ribbons of lemon rind.  It added great flavour and colour, and it didn’t feel as though you were biting into lemon rind.

Although I believe that a salad is just a combination of wonderfully balanced fresh ingriedients that should not require a recipe, there are a few things I’ve learned along the way when creating these grain/starch based salads that may be helpful tips for you:

  • dress the rice, potato, couscous, pasta, quinoa, salad while it’s still warm to hot.  The dressing will be absorbed and you won’t have to adjust the dressing before serving.  (This is a tip I learned from Tim, a local chef and friend who has catered a number of large events for us.  It has made a world of difference for me!  Thanks Tim!)
  • let the dressed grains, pasta cool before adding the vegetables and fresh herbs.  This will prevent the vegetables from cooking and the herbs from wilting and browning
  • never, ever use a bottled dressing…there is way too much of things you don’t need…salt, sugar, multisyllabic things you don’t understand!  Just use two parts quality oil and one part acidity, such as vinegars, lemon juice, lime juice, orange juice, tomato juice, salt, pepper and herbs.  You can even make this ahead in a jar or bottle and have your own ready to go dressing.  In a pich, just dress your salad with a sprinkle of good quality olive oil and a squirt of lemon….It’s miles ahead of any bottled dressing you can find on any level…take the few minutes i takes to make a homemade dressing rather than opting for a ready-made product that has all kinds of things you don’t need – or want!  These are things I learned from my Mom growing up and still prove to be true today!

Happy cooking, fellow ‘everydayhomegourmet’ friends…please share your comments and tips!

Lemon Couscous Salad

  • Servings: 6 to 8
  • Difficulty: very easy
  • Print

IMG-2226

Ingredients

  • 1 cup couscous
  • 1 ¾ cup water
  • Juice of one lemon, plus approx 1 tbsp lemon rind (very thinly sliced)
  • ¼ cup olive oil (use extra virgin for more robust flavour)
  • ⅓ cup carrots, chopped
  • ½ large green pepper, diced
  • 2 green onions, sliced
  • ⅓ to ½ cup roasted chickpeas (optional)
  • Salt and pepper to taste (I use just a sprinkle of salt and about ½ tsp pepper)
  • 4 large basil leaves, sliced thinly
  • Approx. 2 tbsp chopped fresh Italian parsley (sometimes called ‘flat parsley’)

Directions

  1. Place water in saucepan.  Cover and bring to a boil.
  2. Remove pot from heat, stir in couscous.  Cover and let stand about 3 minutes.
  3. Once water is absorbed, couscous is cooked.  Fluff couscous with fork and let cool for 1 to 2 minutes.
  4. While the couscous is still hot, transfer to your serving bowl and dress with olive oil, lemon juice, lemon rind, salt and pepper.  Fluff with fork to combine.
  5. Once couscous is completely cool, add chickpeas, vegetables and herbs.  Stir to combine and fluff with a fork before serving.

Variations:  Use any vegetables or herbs you like!

Tips:  Using a lemon zester will give you lovely thin ribbons of lemon rind.  Also, if you have leftovers, the roasted chickpeas will soften overnight for the next serving and will still taste delicious.  

recipe by: everydayhomegourmet.blog/ 

Keep it Easy in the Summer Kitchen…Cook ahead!

If you’ve read this blog before, you’ll know I am a big fan of spending some time on advance preparation to make healthy and delicious weekday meals and to make clean up easier.  Usually, when we think of cooking ahead, soups, stews, and casseroles come to mind, but typically that is not food most of us would want to eat on hot summer days. Now that we are well into the summer heat, many people want to spend as much time outdoors and as little time in the kitchen as possible.  Of course, we still need to eat healthy balanced meals, so how can we put all that together?

Once again, for me the key is choosing cook ahead options, but with a summer flair!  When I was growing up, our house did not have air conditioning and on those hottest summer days our Mom would announce in the morning, “Tonight we are having ‘cold supper’!”  These meals were not less work for my Mom, but it was time spent chopping rather than time spent using a hot stove or oven that would heat up the house even more. I always loved “cold supper” because we got some great salads that Mom made like tomato and cucumber salad, homemade coleslaw, marinated green and yellow beans, potato salad and our favourite Italian cold cuts or cold roasted chicken from the grocery store.  The store-bought chicken was a rare occurrence because our Mom usually made everything from scratch. It was all delicious and there was lots of variety in those meals!

In my own kitchen, I’ve used the memory of those dinners to keep cooking easy in the summer and always have cold salads and fresh marinated veggies on hand to make quick and easy meals.  Planning ahead also takes the guesswork out of what you are going to make and also ensures that you have a healthy meal on hand. Each week, I spend an hour or two making either a rice, pasta, couscous or potato salad and then prepare some fresh beans to marinate, or Mom’s tomato and cucumber salad, or some grilled asparagus or zucchini.  Then, throw a quick marinade on your favourite protein and grill away! I usually make enough of the salads and side dishes for four days worth of meals and we usually add a fresh green salad too.

As an example, here is how my 4 nights of summer cook ahead options looked when I made a rice salad, coleslaw, and marinated green beans a couple of weeks ago:

Day 1:  Make the Rice Salad, coleslaw and green beans and have it with a burger

Day 2:  Grilled chicken, rice salad, coleslaw, green beans (and a green salad, if you like)

Day 3:  Grilled fish, rice salad, coleslaw, green beans (and a green salad)

Day 4:  Grilled steak, rice salad, coleslaw, green beans (and I always add sauteed mushrooms with steak!  It’s worth the extra few minutes of effort…)


Some skeptics might think this is a bit repetitive, but when you vary the protein, everything tastes different – and you’ll be so happy with the ease of not having to build an entire meal from scratch, while still getting to eat a great meal.  Once you have all the sides decided on and prepared, it takes very little thinking or time to add the meat, chicken, or fish to complete the meal, which reduces the stress of the question…”What are we having tonight?”

At the end of day 1, put all of your pre-prepared salads and side dishes in containers and you’ll be so happy on day 2, 3, and 4 when all you have to do is pull out those containers from the fridge and grill your favourite protein!  (Maybe it’s tofu for vegetarians or vegans!).IMG-2411 (2)


If you follow this plan, your prep and clean up will be a breeze.  You can also follow this plan when entertaining large groups. Get as much done ahead of time as you can and all that will be left to do is the grilling and socializing!


In summary, here are my tips for easy summer cooking and eating:

  • Fill your freezer with a variety of meats – buy what’s on sale in large quantities and bag them in freezer bags in smaller portions for easy use
  • Marinate your beef, poultry, fish, pork, or lamb ahead of time with your favourite flavours and put the portions and marinade in a freezer bag for later use.  (This saves time and clean up on the night you cook)
  • Choose either a rice, pasta, couscous, or potato salad and make enough for about 4 nights to keep your weekday prep and clean up simple
  • Decide on a vegetable side dish that can also be made ahead to complete the meal (my favourites are steamed marinated green beans, grilled asparagus, grilled zucchini and tomato/cucumber salad)
  • Add a green salad to any meal for some variety, leafy greens and extra veggies
  • For desserts:  keep ice-cream, frozen yogurt and individual sponge cakes on hand.  Top them with seasonal fruit, caramel or chocolate sauce and/or whipped cream.  These are minimal prep, delicious and fresh tasting options

I’ll be featuring my make-ahead salad and side dish recipes for the next few weeks, so be sure to check back to get the recipes…Lemon couscous salad will be the next recipe!  It’s yummy! Thanks for reading and please feel free to leave a comment with your tips for summer cooking, eating and entertaining! I’d love to hear your ideas.

Happy cooking!