For most of us summer brings the feeling of a more relaxed pace, probably because everything is a little easier – getting out the door with less clothing, getting around our towns and cities with less traffic and dramatic weather, perhaps less routine since kids are out of school and those around us take vacations or staycations at this time of year. Many people are more visibly relaxed in the summer. I know I am! It’s always been my favourite time of year. Maybe it’s the ease of getting outdoors daily and the calming effect that nature brings whether you are at a park, cottage, an ocean, or in your own backyard oasis. Our get-togethers and entertaining are usually more relaxed in the summer, and more frequent!
Although many of us entertain more in the summer months, I know we don’t want to spend more hours in the kitchen! So, my last few posts have contained side dish ideas to help stay ahead of the game in summer. You might notice that I do not post about desserts very often. The main reason is that I am not a dessert lover, so it’s not really a focus for me. But of course, I always provide dessert when I am entertaining. I used to make lovely cakes, tarts, and pies when I had people over, which of course meant spending lots of time in the kitchen! So, for many years now, I have opted for satisfying and beautiful no-bake options…(I guess that can be another series of blog posts at some point!!).
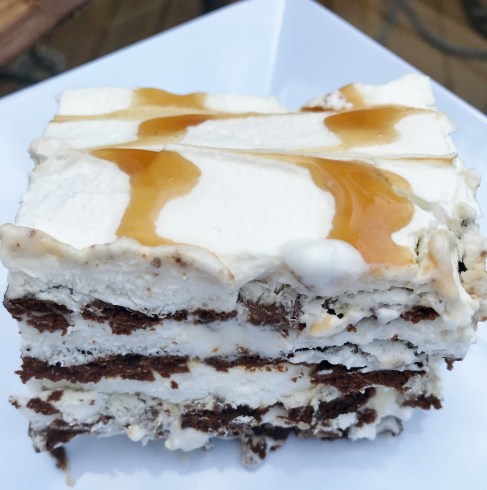
I received this wonderful recipe for a very easy ice cream cake from ‘H’, one of my former colleagues. The first time she made it for our staff, everyone raved about it. And when she shared how easy it was to make, we all begged for the recipe. I have now been making this cake a few times every summer, and it’s a hit with all ages – every time! The cake is made with store-bought ice cream sandwiches, Cool Whip, and caramel sauce. Only 3 ingredients! The hardest thing about this cake is unwrapping the ice cream sandwiches! :>))
You can make this cake in any size you like. I have done a small version in an 8” x 8” pan and a large one in a 10” x 15” pan. When making the small cake, I’ve used about 18 mini ice cream sandwiches, and the large one took about 20 regular size sandwiches. Of course, you could do the small one with regular sized sandwiches too and would simply need to cut them to fit.
After you’ve unwrapped the sandwiches, cover the pan with one layer of sandwiches. You may need to cut some to fit your pan. Next, pour caramel ice cream sundae sauce over the sandwiches:
Spread half a large tub of Cool Whip over top of the caramel sauce. (If you are making a smaller version, you’ll use less). Repeat another layer with the sandwiches, caramel sauce, and Cool Whip. I finish off with vertical streams of caramel sauce and then use my knife to create a cross pattern similar to the pattern of a Mille Feuille pastry. As you’ll see mine is not perfect, but the overall effect is quite nice. I try to make it prettier each time! My good friend, S, shared that you can do this with a toothpick also. I will try that next time, as I’ve found I go a little too deep with the knife, at times.
I try to use natural ingredients whenever I can in my recipes, so this year I used real whipped cream instead of Cool Whip. Upon eating the cake, I noticed that the whipped cream tasted a little icier than the Cool Whip, but it still worked and I felt better about having something less processed in there. Of course, whipping the cream adds another step also, so you’d need some extra time for that.
There are many variations you can try with this cake:
- Make it one layer if your pan is shallow
- Use chocolate sauce instead of caramel sauce
- Use caramel on one layer, and chocolate on the other
- Add sliced bananas to the middle layer
- Use blended mixed berries instead of the sundae sauce – they can be fresh or frozen
All in all, this is a definite crowd pleaser that I make again and again. You can make this anytime and then just pull it out of the freezer ten minutes before you need it. You can even use small foil takeout containers to make individual servings! The possibilities are endless for this cake and I’m so grateful to ‘H’ for sharing this recipe! Take this to your next BBQ and listen for the rave reviews! I’d love to hear which version you choose…Go to the recipe page to get instructions for Easy Ice Cream Cake.
Happy ‘baking’….Happy Summer!

 All you have to do is quickly sautee the garlic, onions, tomatoes, and oregano in a little olive oil until the tomatoes break down. Next, add the fresh mussels and cook with the lid on until the shells open fully. That’s less than 5 minutes. Serve in a bowl with chopped fresh parsley, sliced crusty bread, and a little green salad and you’ll look like a star (or you’ll have a delicious gourmet meal for yourself!!). If you are in a rush, pick up a prepared salad and use your own oil and vinegar dressing.
 My dressing uses olive oil, red wine vinegar, dijon mustard, salt, and pepper. Cook the pasta according to directions for ‘al dente’. When the pasta is still quite hot add the dressing. This will allow the pasta to fully absorb the dressing, increasing the flavour of the dish and you won’t have to adjust the seasonings before serving. Thanks again to our local chef friend, Tim C. for that tip years ago! It has improved all my summer side salads immensely! I used to find it so frustrating to make the potato, rice or pasta salad that tasted great when I first made it, only to find when I went to serve it a few hours later, it tasted like it didn’t have enough dressing, so I’d add more. Thanks to Tim’s direction, I never have to adjust the seasonings before serving. I love that!


